Pages

Wednesday 16 June 2010

Sunday Postcard Art - Roses


Blog-hopping again at lunch and found a lovely challenge site called Sunday Postcard Art - there is a theme every week and you make a postcard (6"x4") out of anything you like around that theme.  Well this week its Roses so just had to join in :O)

Since I was playing with Transfer Paper I used one of the pieces that I had ironed onto a piece of organza fabric - you can't see it in the photo but it has a real nice glitzy sheen to it. I cut a 6"x4" piece of Anna Griffin paper that had  pink roses on it and inked and tore the edges.  From the remainder of the paper,  I cut out the roses and just dotted them aound the image, added a couple of butterflies, a bit of lace and here it is.


Right best try and fill in my appraisal form now - what are my weaknesses???   what a pity I can't say chocolate and crafts :O) 

TFL Polly xx


Tuesday 15 June 2010

Tuesday Taggers - Vintage Bookmark

Whilst blog-hopping earlier I spotted a lovely vintage bookmark on  Clarky's J Playspace so off I went to check out her blog - Janet not only does vintage but she also uses my new fad phase of Stampotique stamps. :O) and shes a big fan of Dy from Art from The Heart in Harrogate.  Her vintage bookmark was for Tuesday Taggers so I have decided to enter this lovely challenge. 

I used a cream card for the base and covered it in Anna Griffin paper which I inked all round with Ranger Vintage Photo.  The image is just one I found on the internet - a little girl playing cats cradle (remember playing that in the playground)!  and it fitted perfectly with a couple of saying from a sheet of Melissa Francis rub-ons which I got in a sale at Tilly's.  Added a couple of pieces of lace and ribbon, a large brad and button and here it is.           

   
That's it for now  TFL  Polly xx

Friday 11 June 2010

Playing with paint

For the last couple of nights I've been playing with cardboard, gesso, black paint and metallic rub-ons. You know when you get in that mood to create something that might just WOW yourself - well this is it!!!  I think :O


I've just used a piece of cardboard, cut out an aperture (saving the remainder for the insert), covered it in tissue paper (making sure I had lots of wrinkles for some texture) and once dried coated it in black acrylic paint.  I then rubbed in some gold metallic rub-ons to create a metallic finish.  Added some gorgeous lace from my stash  (Running with Scissors), spritzed some cream roses with Glimmer Mist and Diamond Stickles, some pearls were added and I used my Tim Holtz  Flourish Die Cut and that's it!!

Well thats it for now as I'm preparing a cigar box (got you one too Sue :O)  ) for holding some vintage tags that I'm in the middle of - Have a good weekend

Polly xx

Monday 7 June 2010

Lets Get Shabby - Paint, Lace and Chipboard

Yeayyyyy - finally got my Lets Get Shabby challenge completed and entered over on their blog ahead of time!!! (my time that is)!   Whatever will happen next!!!

Their challenge this month was to use paint, chipboard and lace in your project - loved the challenge and loved doing this little plaque.


The vintage lady images from Crafty Individuals were covered in clear embossing powder, heated up with my heat gun to melt it all and then popped into the freezer for about 15 mins - once removed from the freezer I lightly scrunched them up to create the cracks.  I then rubbed Walnut Stain into the cracks to highlight them.

2" pieces of chipboard were inked up with Dusty Concord and the embossed images glued on top.  A piece of chipboard was prepared with gesso and once dried a coat of lilac acrylic paint was applied with kitchen roll.  I then painted Tim Holtz crackle paint on it and once the cracks started to appear speeded the process up with my heat gun.  Dusty Concord was again rubbed into the cracks and then round the edges I added Diamond Glaze and covered the edges in little purple beads.  I then added a small rub-on quote to the centre of the painted chipboard.

Some very cheap lace from Boyes (30 pence for a huge bundle)!!  was added round the edge as a frame and because I couldn't stop there!!!! I then painted another piece of chipboard with gesso and then acrylic paint.  Once dried I inked up a lovely large flourish stamp and lightly stamped it round the edges.  A few butterflies were added and that's it I think. 

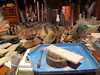
Here is a close up of one of the ladies and the crackle effect created with embossing and Tim Holtz crackle paint.

Again not very shabby - more your vintage style :O).  Just cannot do shabby - Oh well!  For fantastic inspiration please hop over and check out Lets Get Shabby - my fave site if you didnt already know lol. :O)


Well that's it for now

Thanks for looking TTFN

Polly xx